
Άλλη μια ωραία ιδέα για χρήση του Arduino ως μέσο διάδρασης ανθρώπου και υπολογιστή (HCI), με τη βοήθεια και της processing, είναι αυτή που παρουσιάζει ο LuckyLarry.
Πρόκειται για τη χρήση ενός αισθητήτα ultrasonic sonar όπου μετράται η απόσταση και εξάγεται ως τιμή μέσω της σειριακής. Αυτή η τιμή της απόστασης χρησιμοποιείται ως είσοδος στην processing η οποία αντίστοιχα αναπαράγει μουσική ήχους (συγκεκριμένα νότες πιάνου).
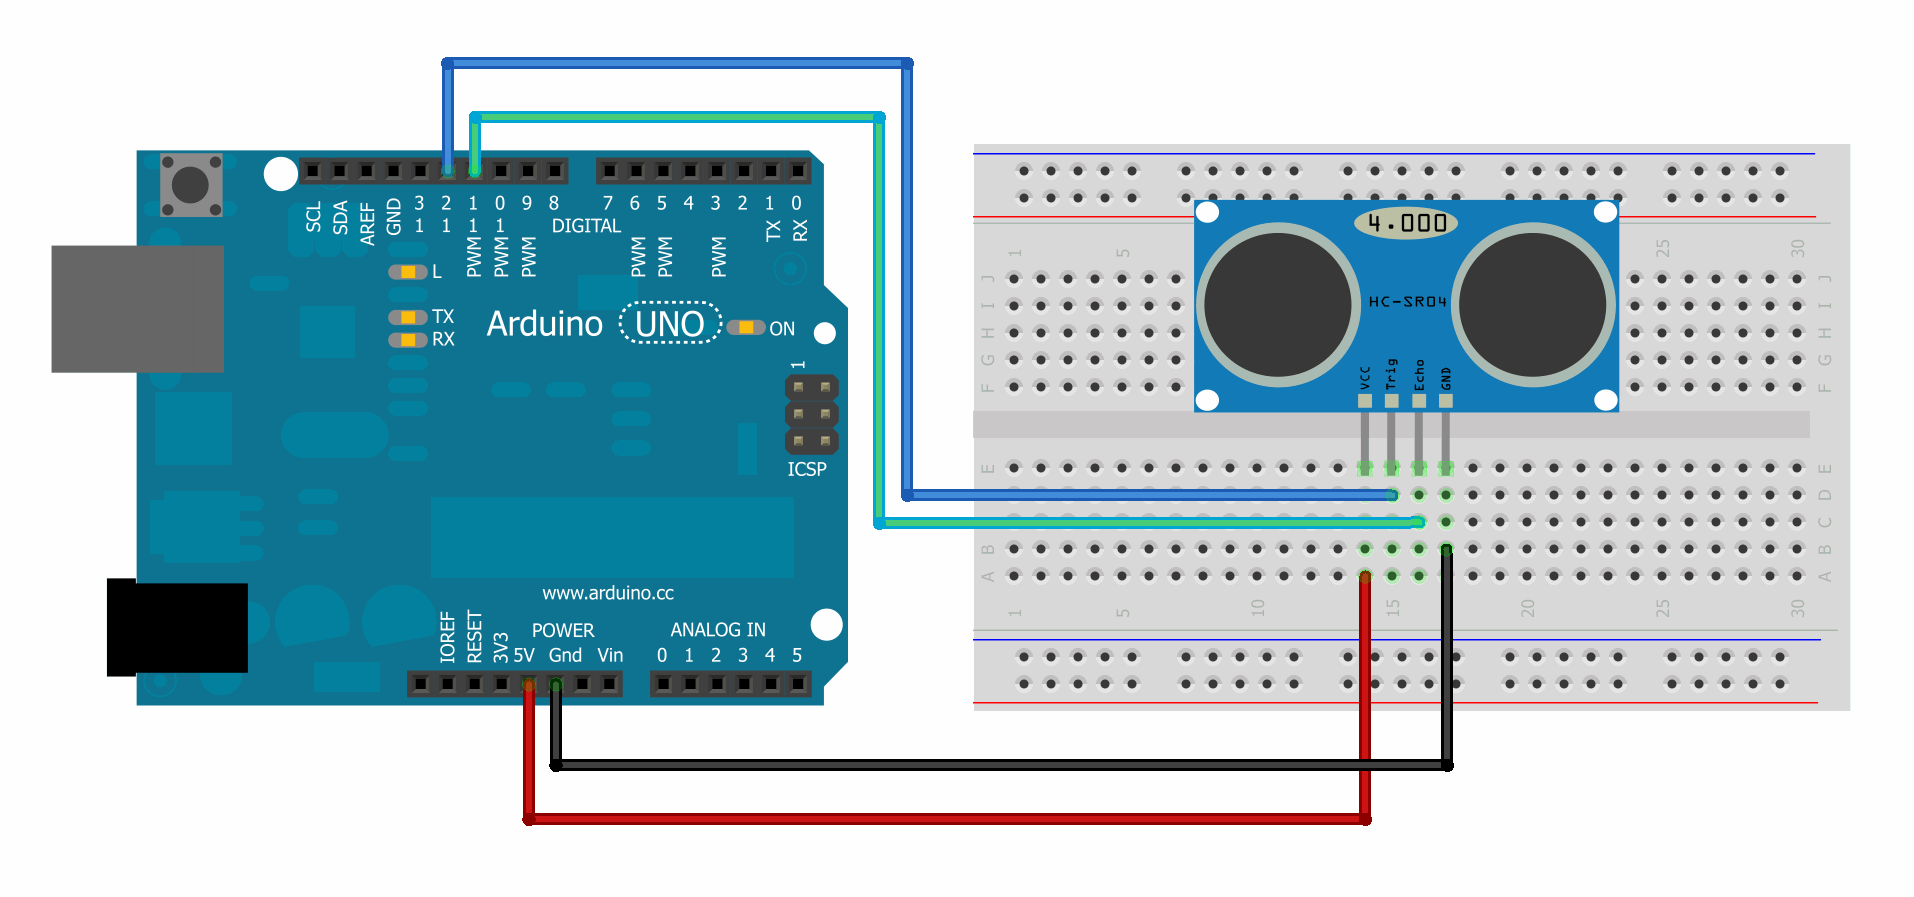
Η συνδεσμολογία του Arduino με τον αισθητήρα απλή:
 Έγινε χρήση της βιβλιοθήκης arduino-new-ping που διορθώνει πολλά από τα πρόβληματα που παρουσιάζουν κάποιοι άλλοι μέθοδοι κώδικα όπως πχ η καθυστέρηση (~1s) στην ανάγνωση τιμών.
Πρόκειται για τη χρήση ενός αισθητήτα ultrasonic sonar όπου μετράται η απόσταση και εξάγεται ως τιμή μέσω της σειριακής. Αυτή η τιμή της απόστασης χρησιμοποιείται ως είσοδος στην processing η οποία αντίστοιχα αναπαράγει μουσική ήχους (συγκεκριμένα νότες πιάνου).
Η συνδεσμολογία του Arduino με τον αισθητήρα απλή:
#include "newping.h"

#define TRIGGER_PIN  12  // Arduino pin tied to trigger pin on the ultrasonic sensor.
#define ECHO_PIN     11  // Arduino pin tied to echo pin on the ultrasonic sensor.
#define MAX_DISTANCE 50 // Maximum distance we want to ping for (in centimeters). Maximum sensor distance is rated at 400-500cm.

NewPing sonar(TRIGGER_PIN, ECHO_PIN, MAX_DISTANCE); // NewPing setup of pins and maximum distance.

//setup
void setup() {
  Serial.begin(9600);                           // start the serial port
}

// execute
void loop() {
  delay(250);                      // Wait 50ms between pings (about 20 pings/sec). 29ms should be the shortest delay between pings.
  unsigned int uS = sonar.ping(); // Send ping, get ping time in microseconds (uS).
  if ( uS / US_ROUNDTRIP_CM > 0)  // send only values >0
  {
  Serial.println(uS / US_ROUNDTRIP_CM); // Convert ping time to distance and print result (0 = outside set distance range, no ping echo)
  }
}
Στον υπολογιστή, εκτελούμε σε processing τον παρακάτω κώδικα που ουσιαστικά "διαβάζει" τη θύρα serial/usb (που έχει συνδεθεί το Arduino) και μέσω της βιβλιοθήκης minim αναπαράγονται μουσικές νότες (freesound.org) ανάλογα με αυτήν την τιμή:
import processing.serial.*;                // import serial library so we can read the serial port
import ddf.minim.*;

// define the serial port
Serial myPort;

// define minim variables:
// here we say that variable A is an audiosample etc...
Minim minim;
AudioSample GSharp;
AudioSample A;
AudioSample Bb;
AudioSample B;
AudioSample C;
AudioSample CSharp;
AudioSample D;
AudioSample Eb;
AudioSample E;
AudioSample F;
AudioSample FSharp;
AudioSample G;

// setup
void setup () {

  // set up the variables, loading in the sound files from your project folder
  // which should be the same place as where you save this sketch
  // details on using minim and audioSample are here: http://code.compartmental.net/tools/minim/manual-audiosample/
  minim = new Minim(this);
  GSharp = minim.loadSample("GSharp.wav", 2048);
  A = minim.loadSample("A.wav", 2048);
  Bb = minim.loadSample("Bb.wav", 2048);
  B = minim.loadSample("B.wav", 2048);
  C = minim.loadSample("C.wav", 2048);
  CSharp = minim.loadSample("CSharp.wav", 2048);
  D = minim.loadSample("D.wav", 2048);
  Eb = minim.loadSample("Eb.wav", 2048);
  E = minim.loadSample("E.wav", 2048);
  F = minim.loadSample("F.wav", 2048);
  FSharp = minim.loadSample("FSharp.wav", 2048);
  G = minim.loadSample("G.wav", 2048);

  // List serial ports, saves us trying to figure out which COM we're using.
  println(Serial.list());
  // Open the active port - providing you've only got one sending serial data (which you should)
  myPort = new Serial(this, Serial.list()[1], 9600);
  // don’t read the serial buffer until we see a new line - this is genius and simple compared with my last efforts
  myPort.bufferUntil('\n');
}

void draw() {
  // we need to declare the draw function even though we're not using it!!
}

void serialEvent (Serial myPort) {
  // get the string from the serial buffer - gets all chars until the next line break...
  String bufferString = myPort.readStringUntil('\n');

  if (bufferString != null) {
    // get rid of any whitespace - sometimes the serial buffer can have blanks etc.. in the string
    bufferString = trim(bufferString);
    // convert the value to an int - we're only sending numbers over the serial port so parsing it to an int shouldn't ever be an issue.
    float inByte = float(bufferString);
    int pulse = int(bufferString);         // declare a variable to hold our value.
    println(pulse);                        // for debug print the value so we can check it.

    // remember that our pulse is in CM so if its less than 5cm then do this etc... else do this... else do this.. for as many sound samples
    if ( pulse < 5 ) {
      GSharp.trigger();
      delay(25);
    }
    else if ( pulse < 8 ) {
      A.trigger();
      delay(25);
    }
    else if ( pulse < 11 ) {
      Bb.trigger();
      delay(25);
    }
    else if ( pulse < 14 ) {
      B.trigger();
      delay(25);
    }
    else if ( pulse < 17 ) {
      C.trigger();
      delay(25);
    }
    else if ( pulse < 20 ) {
      CSharp.trigger();
      delay(25);
    }
    else if ( pulse < 23 )  {
      D.trigger();
      delay(25);
    }
    else if ( pulse < 26 ) {
      Eb.trigger();
      delay(25);
    }
    else if ( pulse < 29 ) {
      E.trigger();
      delay(25);
    }
    else if ( pulse < 32 ) {
      F.trigger();
      delay(25);
    }
    else if ( pulse < 35 ) {
      FSharp.trigger();
      delay(25);
    }
    else if ( pulse < 38 ) {
      G.trigger();
      delay(25);
    }
    else if ( pulse > 50 ) {
      // if the distance is greater than 50cm then play nothing
    }

  } // end if there's a value in the serial bufferstring

}   // end void serialevent()

void stop(){
  minim.stop();
  super.stop();
}
Κατεβάστε τον κώδικα (arduino+processing+sound files) δείτε κι ένα βίντεο:
Καλή επιτυχία!